The Scene Wizard enables you to harness what might be the most powerful aspect of your Vera system: creating custom Scenes (also called scripts) that define what will happen when a specified Trigger event occurs. For example, you can create a scene to automatically turn the lights on whenever a door is unlocked, or fifteen minutes after sunset occurs. Creating a new scene is easy. Click Scenes on your Vera Dashboard to get started.
Assuming you've never created a Scene before, you'll see something like this:

Next select the Add Scene button (in the upper right ) to begin creating your own custom sequence. You may see some help info explaining the process, and Step 1 will appear, asking you to Select a Trigger.

As the Help screen shown above illustrates, the process of creating a custom Scene consists of two basic steps, selecting a Trigger that activates the Scene, and selecting a resulting Action that will occur. (You can have several Triggers and several Actions for the same Scene, and you can also receive a Notification whenever the Scene activates. But for the example we'll show here, we'll keep it basic.)
Selecting the Trigger:
There are three types of Triggers: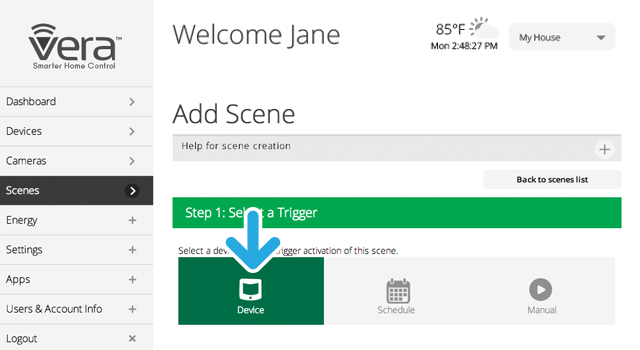
Example: Turn on light when there's motion in the stairway
For the example shown in the next few steps, we're going to create a Scene to automatically turn on a stairway light whenever motion is detected.
In this example, the Device trigger method is selected. We click the right arrow button to the right of Select a Device. We next see a list of our Devices. The list may be organized by Room or by Type, in the example shown below Type is selected. Note that not every Device can be a Trigger Device, and you will only see listed those Devices that can be used as a Trigger. (For example, if you have an alarm siren in your system, you cannot use it as a Trigger because the siren is an output device.)

For this example, we're going to use the Motion Sensor section of the 4-in-1 sensor, so we'll select the right arrow next to this Device.
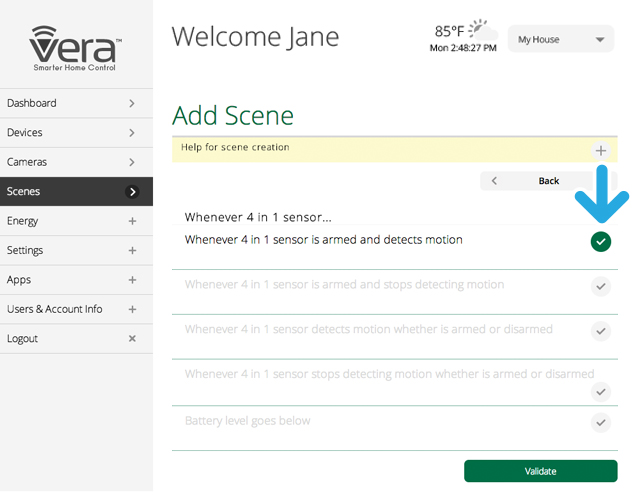
The Motion Sensor has several possible parameters that can be used to trigger the Scene, including whether it is armed or disarmed when motion is detected, and when the battery level is low. For our Scene, we're not really concerned about whether it is armed or disarmed (the question of "arming" is for security applications) or what the battery level (that's a separate alert), so we'll select the third choice in the list, "Whenever 4 in 1 sensor detects motion whether armed or disarmed."
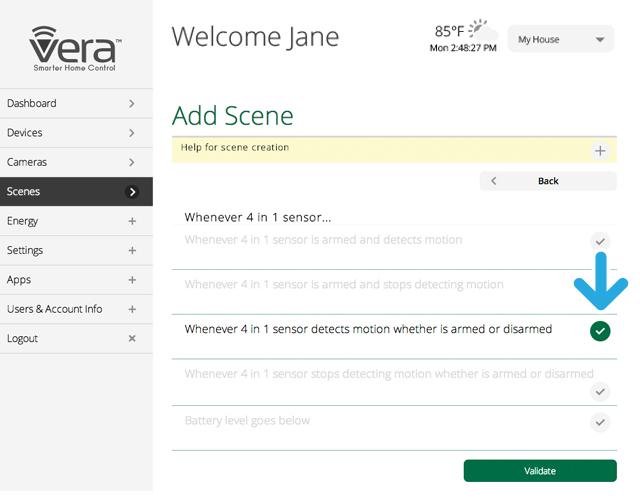
We click to the next screen, see the Device Trigger is properly setup and also see the option to add another trigger before moving on to Step 2. You can have several different things trigger the same Scene, but for this example we'll just use the Motion Sensor. So we select Next Step at the bottom.

Now we're up to Step 2, which is telling Vera what we want to have happen when the Motion Sensor detects motion.
Selecting What Will Happen
For this example we want a Device to turn on the starirway light. The Device is a Lamp Dimmer. So we click the right arrow next to Select Devices. (Note: We'll have the opportunity later to create Notifications whenever a Scene is triggered.)
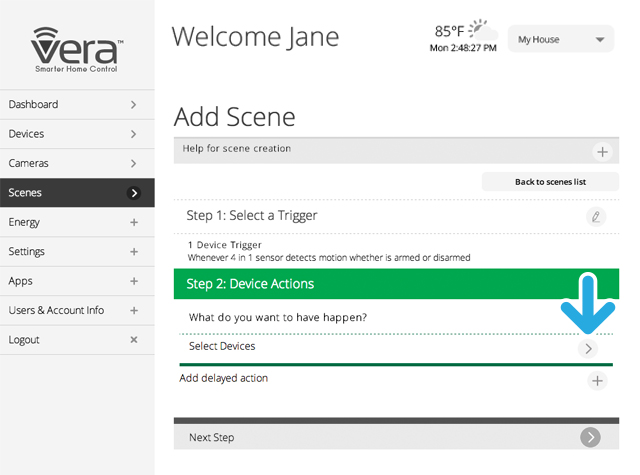
Next we'll see a list of Devices in our system. This list may look similar to, or be the same as the list we saw earlier, for the Trigger Devices. But in this list, only Devices that can perform some action (such as sounding an alarm siren) will be shown. (So in this list, for example, the 4-in-1 Sensor no longer appears, as the sensor cannot be told to do anything, because it is a pure "input" Device.)

From this list we select the Stairway light dimmer, at the top.

A small menu appears asking what the dimmer should do when triggered. We set this to 100% because we want the stairway light to come on at full brightness.
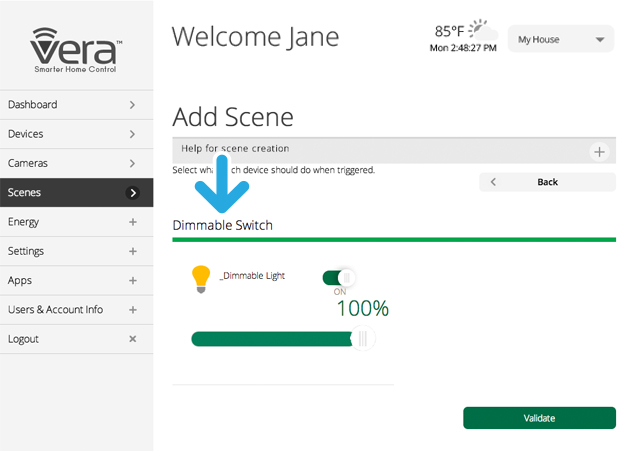
Another option we can add to this Scene is to delay the Action. But that would be annoying, since we want the light to come on immediately if someone is using the stairs, so we'll skip this step.
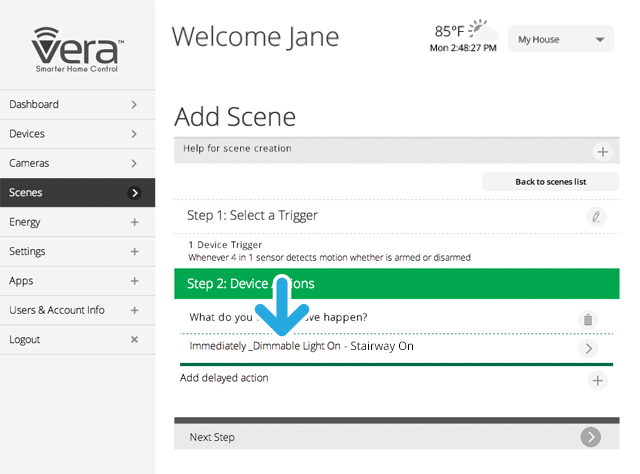
We're done and ready to move on to naming this new Scene and setting up Notifications for it, so we click Next Step at the bottom.

Now we're up to Step 3, where we finish up with a few more details. First is the question of which Modes this new Scene will be active for. Do we want it to run all the time, regardless of whether we're home or away or on vacation That's what "When I am in any mode" means.
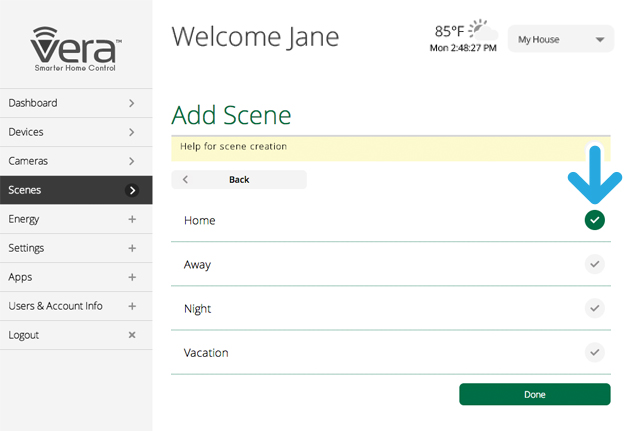
We really only want this Scene to be active when we're home, so we need to make a change from this default setting. We click on the right arrow next to "When I am in any mode." We next see a choice of which Modes to activate the Scene for, and select only Home here, and click Done.

Next we can tell Vera who we want to notify whenever the Scene runs. We could choose to send an email or text notification to any user. But realistically, such notifications are more useful for knowing who is coming and going, or for security applications -- we don't want to notify anyone that the lights have come up in the stairway. So we'll skip this step, and also skip the opportunity to enter custom Luup computer code here (that's strictly for advanced users!) and proceed to naming the Scene.
Naming Your New Scene
You can name a Scene anything you want, but the more descriptive you make it the less confusing things will be later on when you have many Scenes. So avoid names like "my first scene" and go for something that explains what it does, such as in this case, "Stairway Light On - With Motion."
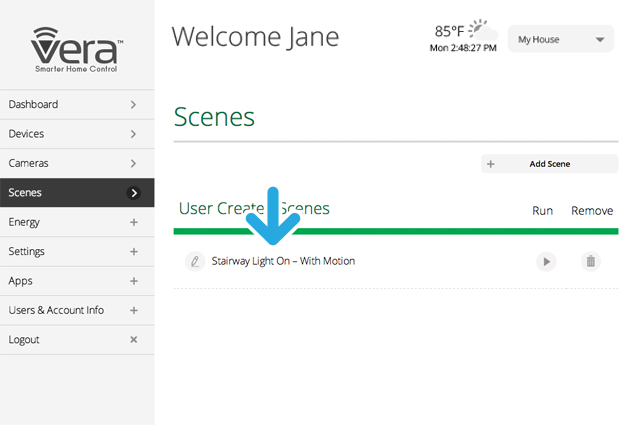
We're done! The new Scene, "Stairway Light Up when Motion Detected," now appears under Scenes on our Dashboard. As mentioned earlier, it's easy to edit the Scene by clicking on the pencil icon to the left of the Scene name.
Testing the New Scene
The new Scene will automatically be active in the Modes that were selected when it was created, in this case Home Mode only. There's nothing more needed to do, it will happen automatically. At this point we can leave the Scenes tab and return to the main Dashboard tab.
Before leaving however, we might want to test our new Scene using the Run button. To be clear, this does not test the entire Scene, but rather, it tests the Action that is set to occur in the Scene. Think of the Run button as a test trigger.
So in the example we've created, instead of waiting for motion in the stairway to occur, we can test our Scene by clicking the Run button (looks like a "play" icon) and observing whether the stairway light comes on.
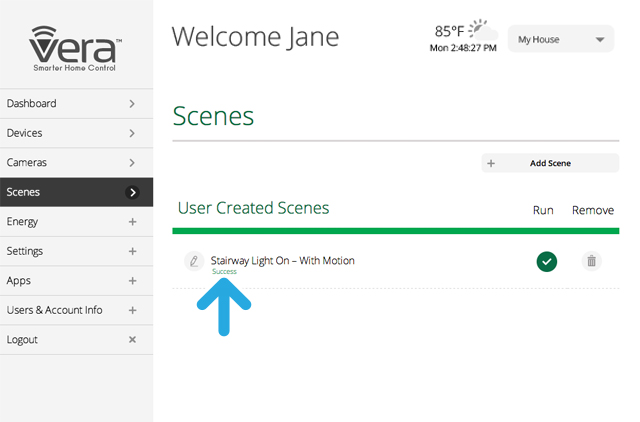
When we run the test it only lasts for a few seconds, during which time the Run button changes to a check mark and "Success" appears if it runs OK. (If there's a problem, the error or fail symbol will appear, as shown in the legend underneath.) Then a few seconds later everything returns to the appearance of the previous screen.
Note: "Run" is For Testing Only
To be clear: Clicking Run on this screen creates a quick test of the Action in the Scene. You do not activate the scene from here. The Scene is automatically active for the Modes that were selected when the Scene was created. In the above example, the Scene will be active whenever Vera is in Home Mode.
Of course this was just one walk-through of Scene creation, and there are so many possibilities! Scenes empower you to automate your home to an extent never before imaginable. You can easily edit your Scenes, and Remove the ones you no longer need or which don't work as you expected, so feel free to experiment.
Next: Settings Tab
Assuming you've never created a Scene before, you'll see something like this:
Next select the Add Scene button (in the upper right ) to begin creating your own custom sequence. You may see some help info explaining the process, and Step 1 will appear, asking you to Select a Trigger.
As the Help screen shown above illustrates, the process of creating a custom Scene consists of two basic steps, selecting a Trigger that activates the Scene, and selecting a resulting Action that will occur. (You can have several Triggers and several Actions for the same Scene, and you can also receive a Notification whenever the Scene activates. But for the example we'll show here, we'll keep it basic.)
Selecting the Trigger:
There are three types of Triggers:
- Device - The Scene will begin when a sensor or other Device in your system changes state, such as a door opens or temperature changes.
- Schedule - The Scene will begin hourly, daily, weekly, monthly or according to whatever schedule you choose, or can be based on sunrise/sunset times for you specific location.
- Manual - You'll create a new button that appears on your Dashboard, and selecting this button will start the Scene.
Example: Turn on light when there's motion in the stairway
For the example shown in the next few steps, we're going to create a Scene to automatically turn on a stairway light whenever motion is detected.
In this example, the Device trigger method is selected. We click the right arrow button to the right of Select a Device. We next see a list of our Devices. The list may be organized by Room or by Type, in the example shown below Type is selected. Note that not every Device can be a Trigger Device, and you will only see listed those Devices that can be used as a Trigger. (For example, if you have an alarm siren in your system, you cannot use it as a Trigger because the siren is an output device.)
For this example, we're going to use the Motion Sensor section of the 4-in-1 sensor, so we'll select the right arrow next to this Device.
The Motion Sensor has several possible parameters that can be used to trigger the Scene, including whether it is armed or disarmed when motion is detected, and when the battery level is low. For our Scene, we're not really concerned about whether it is armed or disarmed (the question of "arming" is for security applications) or what the battery level (that's a separate alert), so we'll select the third choice in the list, "Whenever 4 in 1 sensor detects motion whether armed or disarmed."
We click to the next screen, see the Device Trigger is properly setup and also see the option to add another trigger before moving on to Step 2. You can have several different things trigger the same Scene, but for this example we'll just use the Motion Sensor. So we select Next Step at the bottom.
Now we're up to Step 2, which is telling Vera what we want to have happen when the Motion Sensor detects motion.
Selecting What Will Happen
For this example we want a Device to turn on the starirway light. The Device is a Lamp Dimmer. So we click the right arrow next to Select Devices. (Note: We'll have the opportunity later to create Notifications whenever a Scene is triggered.)
Next we'll see a list of Devices in our system. This list may look similar to, or be the same as the list we saw earlier, for the Trigger Devices. But in this list, only Devices that can perform some action (such as sounding an alarm siren) will be shown. (So in this list, for example, the 4-in-1 Sensor no longer appears, as the sensor cannot be told to do anything, because it is a pure "input" Device.)
From this list we select the Stairway light dimmer, at the top.
A small menu appears asking what the dimmer should do when triggered. We set this to 100% because we want the stairway light to come on at full brightness.
Another option we can add to this Scene is to delay the Action. But that would be annoying, since we want the light to come on immediately if someone is using the stairs, so we'll skip this step.
We're done and ready to move on to naming this new Scene and setting up Notifications for it, so we click Next Step at the bottom.
Now we're up to Step 3, where we finish up with a few more details. First is the question of which Modes this new Scene will be active for. Do we want it to run all the time, regardless of whether we're home or away or on vacation That's what "When I am in any mode" means.
We really only want this Scene to be active when we're home, so we need to make a change from this default setting. We click on the right arrow next to "When I am in any mode." We next see a choice of which Modes to activate the Scene for, and select only Home here, and click Done.
Next we can tell Vera who we want to notify whenever the Scene runs. We could choose to send an email or text notification to any user. But realistically, such notifications are more useful for knowing who is coming and going, or for security applications -- we don't want to notify anyone that the lights have come up in the stairway. So we'll skip this step, and also skip the opportunity to enter custom Luup computer code here (that's strictly for advanced users!) and proceed to naming the Scene.
Naming Your New Scene
You can name a Scene anything you want, but the more descriptive you make it the less confusing things will be later on when you have many Scenes. So avoid names like "my first scene" and go for something that explains what it does, such as in this case, "Stairway Light On - With Motion."
We're done! The new Scene, "Stairway Light Up when Motion Detected," now appears under Scenes on our Dashboard. As mentioned earlier, it's easy to edit the Scene by clicking on the pencil icon to the left of the Scene name.
Testing the New Scene
The new Scene will automatically be active in the Modes that were selected when it was created, in this case Home Mode only. There's nothing more needed to do, it will happen automatically. At this point we can leave the Scenes tab and return to the main Dashboard tab.
Before leaving however, we might want to test our new Scene using the Run button. To be clear, this does not test the entire Scene, but rather, it tests the Action that is set to occur in the Scene. Think of the Run button as a test trigger.
So in the example we've created, instead of waiting for motion in the stairway to occur, we can test our Scene by clicking the Run button (looks like a "play" icon) and observing whether the stairway light comes on.
When we run the test it only lasts for a few seconds, during which time the Run button changes to a check mark and "Success" appears if it runs OK. (If there's a problem, the error or fail symbol will appear, as shown in the legend underneath.) Then a few seconds later everything returns to the appearance of the previous screen.
Note: "Run" is For Testing Only
To be clear: Clicking Run on this screen creates a quick test of the Action in the Scene. You do not activate the scene from here. The Scene is automatically active for the Modes that were selected when the Scene was created. In the above example, the Scene will be active whenever Vera is in Home Mode.
Of course this was just one walk-through of Scene creation, and there are so many possibilities! Scenes empower you to automate your home to an extent never before imaginable. You can easily edit your Scenes, and Remove the ones you no longer need or which don't work as you expected, so feel free to experiment.
Next: Settings Tab

Comments
0 comments
Please sign in to leave a comment.